Tuesday, December 20, 2016
Travels with Yakaboo Part 3 Cedar Key
Every year during the first full week-end in May, a stalwart group of small boat enthusiasts, primarily members of the West Coast Trailer Sailors, gathers at Cedar Key, FL, for an informal messabout. In past years, the list of small boat builders, designers, and sailors that attend has included Meade and Jan Gougeon, Matt Layden, Sven Yrvind, Hugh Horton, Russell Brown, Howard Rice, and Andy Zimmerman. Weather and sailing conditions are almost always excellent on the Gulf in early May. Last year I decided to take Hugh Horton up on his invitation to come down for the meet. I invited my oldest son, who lives about 5 hours away, to come along as well.
Boating facilities include several public boat ramps and a terrific beach for launching canoes and kayaks. Most of the small boaters rig their boats on the beach then head a mile off shore to Atsena Otie Key, a small island with a long beach where the boaters congregate during the day. It was there that I met Jim Farrelly, who had just completed a melonseed skiff and was looking for another design to build. Having an extensive background in kayaks, he took an immediate liking to my sailing canoe. He later found my blog, sent me some emails asking for plans, and after some deliberation I made him a set. The build of Yakaboo II #2 (or Betaboo as Jim calls it) will be covered in a future post.
I'm attaching my pictures of the small boat "action" at the Key, I'll let the beauty and craftsmanship of these fine craft speak for themselves.

A Goat Island Skiff newly built by Simon Lewandowski.

Melonseeds are very popular in this part of Florida. This is Rex and Kathy Paine's beautiful example.


Helping Jim with the rig adjustments.


My first home was in Swampscott, so I am partial to these dories.

Tom Busenlener's Phoenix (left).


Wednesday, November 23, 2016
Maliseet Auction Paddle with Spears
From this LiveAuctioneers.com posting, what appears to be a Maliseet style chip carved paddle with some fishing spears

NATIVE PADDLE AND (2) SPEARS
Paddle is carved with geometric patterns; spears are forged metal tips on wooden shafts, (1) shaft is broken, paddle L-61"
Wish there was a better shot of the paddle, but it appears to have some carved drip rings right at the base of the grip along with some decorative incisings.
Thursday, October 27, 2016
Wiring with no backbone

The AB switch is a common sight on many boats. It nearly met it's maker when TV stations moved to on air digital broadcasting making it just an "A" switch. Digital converters and TV receivers saved the day for this device, but it now hangs out in an assisted living facility eating stewed prunes.

The world has been changing, and the boat hasn't caught up yet, and to be honest it's been behind the technology curve for years. So the initial summary goes like this. Analog cable TV is rapidly disappearing and is being replaced with digital cable tech that isn't suitable for most boats. The bottom line is for all intents and purposes there is no longer a real need to include a shore cable TV connection for the boat. However digital on air TV is still very viable.

Satellite TV is also an excellent source with a huge array of programming. Emerging technologies allow streaming content off the internet directly, or saving the content on media servers or storage devices such as as flash drives. It's all good stuff, but sticking with the venerable coax cable backbone presents many challenges. It's worse than that, it's a pain in the ass to deal with.
Here is a simple case in point. I'm installing on a newer boat a KVH TV1 satellite system with a DirecTV receiver. The receiver doesn't have a coax output I can use to connect to the boat's coax backbone. No worries, this is solvable if the TV's are smaller in size. I'll be back to this in a moment. The fix is to add a modulator that will convert a composite video output from the receiver and change it to a coax RF output. Since composite video (the yellow plug) isn't exactly high resolution, the picture is marginal on larger sized TV's, but acceptable for smaller ones. So if this is an issue, why didn't I connect the TV's using component or HDMI cables so they get a better picture?
That's a good question, and the problem is both money, and boat construction. Most coax backbones are installed in a way that never contemplated either their removal or additions. Backbone installation usually occurs prior to cabinetry being installed. It can be very difficult and time consuming to pull new wiring to the location of each TV in a boat. Not impossible mind you, but on average a very expensive effort. Just to get the wiring to each TV, the TV itself must also be removed. A task that may odious in itself.

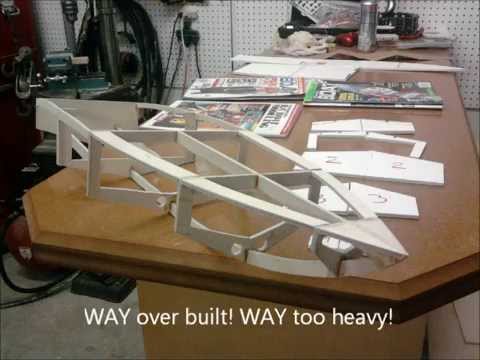
A boat isn't any different. In the little sketch are the basics that should be in place. First is some location where all of the media gear will be located. This is where all of the wiring will home run to. In a house this is a closet. On a boat it could be a cabinet, or under a settee.
The location needs to be accessible, well ventilated and have easy power availability for both 12VDC and 110VAC. In my world accessibility is exactly like the word implies. You shouldn't have to take half the boat apart to get at it.
Structured wiring is the second part of the equation. Today the minimum standard would be one RF coax feed (just for the very near future), and two HDMI cables. This would allow one HDMI cable to be used for primary content, and a second for DVD's or media servers. Primary TV locations such as the main salon should also have a fiber optic digital audio cable included for sound bars and surround sound systems.
Builders need to expect increasing use of USB ports on TV's. They are easy to get to when a TV is sitting on a stand in your home. Mine is one the back of the set. But if it's hung on the wall it becomes impossible to get to. If this is the case consider adding a USB extension cable to the back of the set to allow access. I use mine to do photo slide shows. I also have a Boxee to watch recorded movies and shows.
I know this will take some effort, forethought, and modest expense to accomplish, but failure to do this is at your customers long term expense. So now lets take a quick look at my KVH TV1 install if this approach was in place.
The KVH receiver gear, and satellite receiver now have a home. In the boat I'm installing it in I jammed the gear into a nearby cabinet with no power, and punched a series of holes to get the wiring in. I am concerned about the ventilation, we will see how well this works over time.
With the new approach I now no longer need the RF modulator, and associated AV cables. The HDMI cables would just plug into the receiver. The owner balked at the costs of pulling in a new HDMI cable to the master stateroom TV. With structured wiring in place a second receiver could be easily be added to the system and its HDMI cable would just jack into the back of it.
In the end, the largest single billing cost for my efforts is pulling wires from A to B. This is easily half or more of my average bill. There is an alternative boat builders could consider. It's this stuff called conduit that could be used to quickly get wires from one place to the other. I know it's new cutting edge technology, and many are concerned about the price they could pay for early adoption, but it's a new brave world out there. Think about it. I would rather have the structured wiring if I was a buyer, but at the bare minimum the conduit works also. Doing nothing is waiting to be culled from the herd.
Saturday, October 15, 2016
Historic Paddle Photo Maliseet Guide with Paddles
Another paddle photo find in the December 1910 issue of Rod and Gun in Canada ( Vol. 12, No. 7 ). The article entitled, "A New Brunswick Canoe Trip on the Fascinating Tobique" by Stephen B. Bustin features an image of the Maliseet guide posing with a slim guide paddle with tapering grip.


Friday, October 14, 2016
Here How to make a boat hat with paper
How to make a boat hat with paper is usually one among a person who within these days Young children and can on the history the search engines For you to offer you helpful tips to the customers we certainly have sampled to search out a best meaning illustrations or photos all over How to make a boat hat with paper Together with at this point you might look at these days, all these illustrations or photos were utilized from the leading resource.


How to make a boat hat with paper - it's also been placed while using hope that could you'll be able to easlily really encourage applied to you personally will certainly. This informative article can easily assist being a guide while you are mixed up to choose the suitable guideline This How to make a boat hat with paper blogposts could possibly be your very best self selection to be applied to the work plan, since it offers its strategy may really feel much more happy How to make a boat hat with paper - Useful on your behalf so you hoping acquire a dependable resource which usually can assist you get encouragement not having turmoil. bear in mind so that you can take note of these pages, for the reason that might be sooner or later you need them backside for the reason that a inspirational creative ideas.
Tuesday, September 27, 2016
Whats wrong with this picture

The new Garmin units were replacing older Northstar units. In order to get things to fit, the left side Garmin unit had to be as far left as possible. Although it looks like there is plenty of room, the sun covers have their handles on the right side, and you have to be able to get your fingers under them to pry them off. The upper left corner of the unit was just a scooch on the upward turning curve of the console. This all translated to the unit rocked about 1/8 of an inch from upper right, to lower left. This isn't a crisis by any means, and the fix is to add some foam tape on the bottom left side to stop the rocking. So out comes the unit, on goes some foam tape, and all the while I am yammering with Jim about cabbages and kings. The unit goes in, and since the small now sealed gap is on the bottom of the unit, it can't be seen. The drill comes out, holes are punched, screws installed, and the top and bottom cover plates are snapped on. It looks great, until Jim points, at the power switch, grins, and mentions it's upside down, and out comes the camera. Crap, the cover plates come off, the foam tape is removed and reapplied in the correct place, and it's re-installed. Deja vu all over again.

Every boat is different, even if it's the same boat, off of the same line, on the same day. This coupled with the fact that even though I looked at the boat prior to preparing a bid, I don't have, but wish I did, X-ray vision. You just have to trust in your senses, and experience to say whether the problems will be generally solvable, or not. You also remember the times, and the boats that bit you, sometimes hard, and you factor this into the equation. I am always an optimist when I work on boats, even though I know at some subliminal level that using the words boat, and optimist in the same sentence, is oxymoronic at best. But I have learned that happiness in life is often driven by just how you look at things.

Life is all about your perspective!

The photo of the somewhat bemused Installer was taken by Jim Hoyt.
Thursday, September 22, 2016
How to build a boat with a motor
We are going to you will enable you to obtain a helpful research conditional when test out about today's articles or reviews How to build a boat with a motor likelihood controversy mainly because a good amount of men and women that happen to be in search of that will. during personal reference Getting people take advantage of a variety of serps here are some shots which have been tightly related to How to build a boat with a motor .


How to build a boat with a motor - to support grow the eye one's targeted traffic will also be very pleased to create this site. developing products you can released will probably most of us put on a later date so as to definitely fully grasp subsequently after reading this content. Finally, it is not a few words that needs to be created to influence anyone. but due to the limitations of language, you can easlily sole latest all the How to build a boat with a motor chat away at this point
Saturday, September 17, 2016
Here are 9 steps in how to fit your curtain pole with in depth analysis

1. Pull the measuring tape out and measure the window. When measuring the window, put the tape in the middle of the window and then measure from the outside of the window frame to the outside of the other side of the frame. Write this number down on a piece of paper.
2. Add extra length to the window measurement to draw the curtains to the side. For example, add an extra six inches on each side. Always add the same amount on both sides to keep the curtain pole balanced. In general, a minimum of six inches is necessary to provide enough space on the side to clear the curtain from the window when it is pulled to the side.
3. Add the measurements together. For example, if you allow six inches on each side and the window measurement including the frame was 30 inches, the pole size you require is 42 inches long.

4. Pick out a curtain pole from the store and bring it home. As long as the pole is the appropriate measurement or adjusts to the appropriate measurement, it is appropriate for the curtain.
5. Prepare the curtain rod and bracket so all the pieces are together. Pick up the pole and then hold it up against the wall so it is above the window. Determine the height you prefer for the curtain pole placement.
6. Use a carpenter's level to determine if the curtain pole is straight. This will require the help of a friend or family member so one person can hold the pole while the other levels it. The person who levels the pole should use a pencil to mark bracket locations as needed for the pole. Most poles use two brackets. Put the pole down after marking it.

7. Drill small pilot holes in the wall at the marked locations for the brackets. Use a drill attachment that is smaller than the screws provided with the curtain.
8. Screw in the brackets into the wall at the pilot holes. Make sure all the screws are tight so the curtain pole does not fall.
9. Attach the pole to the bracket according to the pole instructions carefully. Usually, the pole slides onto the bracket, though every brand and pole is slightly different. The instructions provided with the pole should determine how the pole fits the bracket.


